ingilizce kelime/cümle/gramer

Wednesday, May 23, 2007

Windows ServisiHata Ayıklama(DEBUG)

Baktım çok bir türkçe kaynak yok bende öğrenirken iki dakikada çevirir belki birilerine Allah rızası için yardımcı olurum dedim.
Makalenin aslı

Ben resimleride oradan alacağım inşallah bilginin dağılması hasebiyle yazarıda sıkıntı çıkartmaz.

Derlenmiş çalıştırılabilir dosyalar(servis uygulamaları) debug edilemez F5 ya da F11 ile.Servisi yüklemeli debugger'ı servise eklemelisiniz.

Şimdi kendi servis uygulamamıza bunu yapalım;

Windos Servisinde hata ayıklama adımları:

  1. Servisinizi yükleyin.

  2. Servisi başlatın(bunu çalıştıra "services.msc" yazıp enter tuşu ile gelecek ekranda yapabiliyordunuz).

  3. Projenizi Visual Studio.NET ile açın.

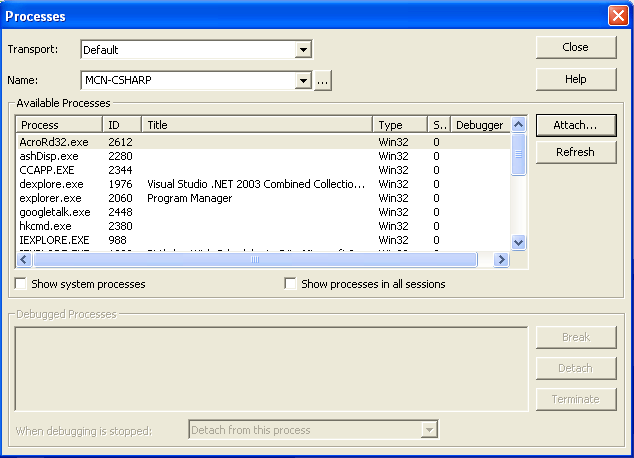
  4. Debug->Attach to Processes penceresini açın aşağıdaki gibi olacak. (benim kullandığım sürümde Attach yerine Select düğmesi var ama bu da aynı işi görüyor)


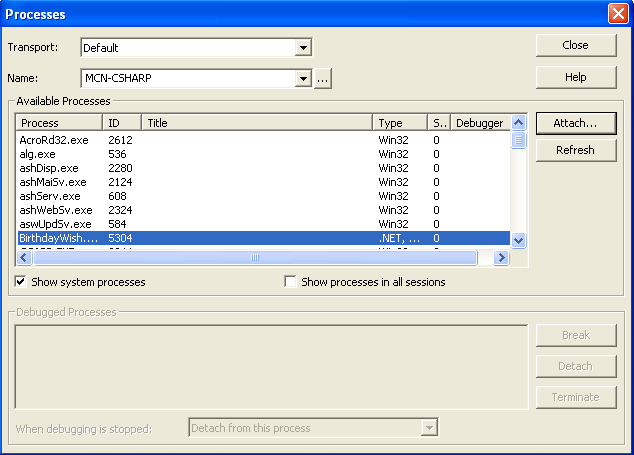
  5. "Show system processes" e tıklayın.

  6. "Available Processes", ekranında servisinizin çalıştığını çalışabilen dosyanızın adı ile göreceksiniz.(Burada BirthdayWishScheduler.exe)


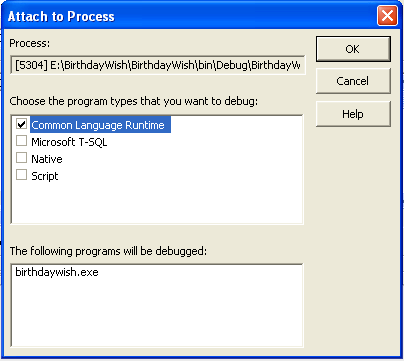
  7. "Attach" düğmesine basınca "Attach to Process" kutusu çıkacak.Burada ne tür bir program bu servise ataçlayacağınızı seçiyor ve OK düğmesine basıyoruz.(benim kullandığım sürümde "Otomotaik Algıla ne ile Debug edeceğini" diye bir checkbox ve "Aşağıdaki Debug Kodlarından birini seç" diye bir tık daha var ama ikiside aynı işi görür.Özellikle de ben seçeyim oradan "Managed" sekmesini seçtim ben)


  8. Düzgün birini seçtikten sonra debug modunda uygulamanız gelecektir.

  9. Şimdi gelen ekranda(seçtiğini debug ortamında) breakpointler koyup adım adım ilerleyip DataTable, DataSet lerin içini değişkenlerin değerlerini görebilirsiniz.

  10. Servis Control Yöneticisinden farklı seçimleri (start, stop gibi) görebilirsiniz

Sunday, May 06, 2007

Visual Studio Tips and Tricks ( http://www.visualstudiotips.com/ )

Tip #1: The Task List Window

Filed under: Visual Studio 2003, Visual Studio 2005, Beginner — Colin Murphy @ 11:07 pm

The Task Window is a standard Visual Studio tip which makes it a good option for the first tip that I tackle. The task window provides a way for you to document items within your code that you need to revisit at a later date.

Task List Window

By default, the task window is not visible, so the first thing you must do is make the task list visible. As with most things in Visual Studio, you can achieve this with either a keyboard shortcutt (Ctrl+Alt+K) or by going to View | Other Windows | Task List.

The task list can be filtered to show a variety of tasks. By default, it is probably filtered to show only Errors. Right click on the task list and select Show Tasks | All. Now, all tasks will be visible.
Your task list is probably still empty though because no tasks have been added to your code.

Tasks are added via comments within your code. Visual Studio understands several keywords that indicate your comment should appear in the task. These keywords are: TODO, HACK, UNDONE. Additionally, you can configure your own comment keywords that will appear in the Task List.


//This line won't appear in the Task List

//TODO Need to implement logic for the postback

//HACK This is an ugly hack and needs to be rewritten when time permits

//UNDONE This is usually used after you've commented out some code,
//which needs to be uncommented at some point

Not clear enough? View my flash walkthrough (2 MB)!

If the keywords listed above aren’t sufficient for your needs, or you want to use tokens with additional higher or lower priorities, you can create your own custom comment tags. To do this, go to Tools | Options | Environment | Task List | Task List Options and add a comment token with the appriate priority.

Want to learn more about the Task List Window? View the MSDN page on the topic.

-----------------------------------------------

Tip #2: Changing the Default Paste Behavior To Use Paste As HTML

Filed under: Visual Studio 2003, Macros, Intermediate — Colin Murphy @ 12:24 am

If you have been using Visual Studio .NET for any period of time, you have no doubt run across the semi-crazy paste behavior that occurs when you paste code copied from an HTML page (such as example code) into a .ASPX or .ASCX page. Instead of just pasting the copied text as you might expect, Visual Studio adds HTML markup to the content. This is best explained by example…

If you copy this code:


Into an .ASPX page, you’ll get something like this screenshot:

Image of paste example

I have yet to encounter an instance where the above was the desired outcome of my pasting effort. If you paste the text into a .cs or .vb file, you’ll find that the paste works the way you think it should.

Now, some of you are saying, “Colin, the fix is easy, just select ‘Paste as HTML’ from the Edit menu and the text will be pasted as you expect.” That is indeed correct. Edit | Paste as HTML works the way I expect the default paste should, and I have gladly put up with this solution for several years…but sometimes you have to say, enough is enough!

My initial thought was to remap, Ctrl+V (Paste) to Paste as HTML. That is easy to accomplish and, at first glance, seems to fix the problem. Copy some text from the web and select Ctrl+V in an .ASPX file and the text appears exactly as desired. BUT, the Paste as HTML option is only available on pages like .ASPX and .ASCX. If you switch to a .cs or .vb file and press Ctrl+V you’ll quickly learn that Paste as HTML DOES NOTHING. So remapping Ctrl+V to Paste as HTML is a dead end.

Since the simple solution didn’t work, I decided to write an intelligent paste macro. This macro will load the Edit.PasteasHTML command, see if it is active, and if it is, it will paste using PasteAsHTML, otherwise, it will use the standard paste.

    Sub IntelligentPaste()

Dim UsePasteAsHTML As Boolean = False

Dim pasteHTMLCommand As Command = DTE.Commands.Item("Edit.PasteasHTML")

If Not pasteHTMLCommand Is Nothing AndAlso pasteHTMLCommand.Name = "Edit.PasteasHTML" Then
UsePasteAsHTML = pasteHTMLCommand.IsAvailable
End If

If UsePasteAsHTML Then
DTE.ExecuteCommand("Edit.PasteasHTML")
Else
DTE.ActiveDocument.Selection.Paste()
End If

End Sub

Armed with our new IntelligentPaste macro, we just have to map the IntelligentPaste macro to Ctrl+V and Presto! Pasting in .aspx, .ascx, .cs, .vb, etc. behaves the same.

Watch the flash tutorial (1.9 MB) which covers all of the above, plus how to do the keyboard mapping!

Those of you upgrading to Visual Studio 2005 in the near future will be happy to know that Paste As HTML is now the default pasting behavior (so this tip is somewhat short lived).

--------------------------------------

Tip #3: Go To Definition

Filed under: Visual Studio 2003, Visual Studio 2005, Beginner — Colin Murphy @ 8:37 pm

One of the most useful functionality items that I use has been the Go To Definition context menu item. To use Go To Definition, simply right click on a method, variable or class from within Visual Studio.

Go To Definition

Once you click on Go To Definition, Visual Studio will take you to the source file & line where that item is defined.

Watch the flash tutorial! (364 KB)

----------------------------------------------------------

2.5

Tip #4: Property Creator Macro

Filed under: Visual Studio 2003, Visual Studio 2005, Macros, Intermediate — Colin Murphy @ 7:21 pm

One of the nice new pieces of functionality that came along with .NET was properties, which are basically just encapsulated Get/Set methods for variables. While properties are nice, it can be fairly tedious to write them, especially when you have a bunch of variables you need to create properties for. Since it is a tedious procedure, I’ll sometime find myself just making public variables, adding a “//TODO Create Properties for these variables” comment and moving on. I eventually do get around to creating the properties, but I thought it would be nice if there were a way to automate the whole process.

For those of you that use UML tools like Rational Rose/XDE or Enterprise Architect (my current favorite), you can always add the attribute to the class in your class diagram, cross your fingers, and forward engineer you code. It usually works…. But that is still a lot of work for something that should be pretty simple. And if you don’t use a modelling tool, you’re plain out of luck.

In order to make my life easier, I wrote a macro to automate property generation. Unfortunately, the macro only works with C# code at the moment, but I will write a VB.NET version eventually.

Consider the variable declarations below:

        protected System.Web.UI.WebControls.Label lblPageLabel1;
protected System.Web.UI.WebControls.Label lblPageLabel2,
lblPageLabel3;
private String _userName = "username"
//Need to think about changing password type to Byte[]
private String password;
private int m_timeout = 60000; //1 minute
/*
private Mailbox _mailbox = new Mailbox( "test@domain.com", "password" );
*/

The above code doesn’t reflect my coding practices, but is merely designed to give a variety of examples of how variables can be defined. Some developers use _ or m_ to indicate global variables (I use _) while others do not use any coding convention to distinguish global variables from local variables. Comments might be interspersed with the variables as well and some variable definitions might even be commented out.

The macro has two primary usage scenarios, you can either hightlight the code block you wish to create properties for and execute the macro or you can have no text selected and execute the macro, in which case the macro will prompt you for the desired variable, type and property name. In either case, the macro will generate the property definitions and then either place the code within a property region block located somewhere within your code or it will copy the code to the clipboard so that you can paste it in the desired location.

If you selected the example code in Visual Studio and ran the macro, you’d find that Property definitions will be created for each variable except for _mailbox, since it was commented out. Property names are generated by first stripping away m_ or _ and then capitalizing the first letter. So _mailbox becomes Mailbox, m_timeout becomes Timeout.

Watch the flash demonstration ! (1.86 MB)
Download the code for the macro! (3KB)

The code for the macro can also be found below:
(more…)

----------------------------------------------------------

Tip #6: Counting Lines Of Code

Filed under: Visual Studio 2003, Visual Studio 2005, Plugins, Beginner — Colin Murphy @ 1:09 am

Over the course of development, you may, at times, have a need to know the number of lines of code within your .NET Solution. While there are a few plugins available that will provide you this information, my favorite is the Project Line Counter a free plugin written WndTabs.com.

Screenshot from the Project Line Counter showing lines of code

The screenshot above displays the line counts for a particular solution broken out by line type (code, comments, blank, etc) and by file. The view can be sorted based on multiple criteria, allowing a good view of the lines of code. The view can be further filtered to a single project within the solution. The line count data can even be exported in both CSV and XML formats.

Watch the flash demo of the Project Line Counter in action! (1.68 MB)

October 16, 2005
9.0

Tip #5: Customizing Your Code Templates

Filed under: Visual Studio 2003, Beginner — Colin Murphy @ 6:34 pm

Whenever you create a new file in Visual Studio it comes already stubbed out to some degree. For example, when you create a new WebForm in a C# web project, you’ll find that the code behind file already has a Page_Load method that looks something like:

 private void Page_Load(object sender, System.EventArgs e)
{
// Put user code to initialize the page here
}

I appreciate the Page_Load stub, but that comment about putting user code here is getting pretty old these days. It might have been useful the first time I ever created a web form, but after years of writing code, it is more of an annoyance than anything else. Wouldn’t it be nice if you could change the default code behind file so that it actually corresponded to your coding styles?

For example, I almost always have an “if( !IsPostBack ) {}” code block in my Page_Load method. Perhaps it would be nice if we could make that always appear. I’m also a big fan of #region’s and have some common regions that appear in almost every .cs file I create. I’d like to have an Events, Properties, Public Methods, Private Methods, and Member Variable blocks already defined for me in my code.

Luckily, customizing the template that generates your .cs or .vb files is pretty simple:

The templates are located in a subdirectory of your Visual Studio directory. For me, those directories are:

C#: C:\Program Files\Microsoft Visual Studio .NET 2003\VC#\DesignerTemplates\1033
VB.NET: C:\Program Files\Microsoft Visual Studio .NET 2003\Vb7\DesignerTemplates

For those of you who use C++, the templates are more deeply buried. For example:
C:\Program Files\Microsoft Visual Studio .NET 2003\Vc7\VCWizards\mc++winapp\templates\1033 has templates for Win Apps.

So, to customize your template, simply navigate to your respective directory. The C# directory contents look something like:

InheritedTemplate.cs, NewGlobalAppCode.cs, NewWebFormCode.cs, NewWebServiceCode.cs, NewWebUserControlCode.cs

For this example, I’ll be editing the NewWebFormCode.cs. The steps discussed should be easily applicable to your respective language template though.

So, open up NewWebFormCode.cs. You’ll see something like:

...
namespace $NAMESPACE$
{
///
/// Summary description for $CLASSNAME$.
///

public class $CLASSNAME$ : System.Web.UI.Page
{
private void Page_Load(object sender, System.EventArgs e)
{
// Put user code to initialize the page here
}


}
}

Now, change the template as desired. Any text that appears in the template will appear in your new code.

View the flash demo! (4.25 MB)
Download the template created in the demo! (1KB)

The template code from the demo is also listed below:
(more…)


----------------------------------------------------------

Tip #8: Debugging DataSets With The XML Visualizer Add-in

Filed under: Visual Studio 2003, Plugins, Debugging, Beginner, Intermediate, Advanced — Colin Murphy @ 5:17 pm

If you’ve ever tried to debug some code that is relying upon data in a DataSet, you’ve probably found it quite painful to discover the contents of the DataSet while debugging. You can patiently expand the elements of the DataSet in the watch window or use the Command window to display the DataSet values, but that can be very time consuming. This tip focuses on a fantastic, free add-in called XML Visualizer that makes viewing XML data easy.

XML Visualizer “allows you to visualize most XML and XML-backed data sources during runtime” and supports the following object types: “DataSet, DataTable, DataRow/DataRow[]/DataRowCollection (attached), DataView, DataRowView/DataRowView[] (attached), DataViewManager, XPathNavigator, types implementing IXPathNavigable, well-formed XML in strings, Exception, or any XML-serializable type”.

After installing the visualizer, it is quite simple to use. While debugging, highlight a supported initialized instance variable, right click on it, and select XML Visualizer. You’ll then see a window looking like:

XML Visualizer Visual Studio Add-in Screenshot
The XML Visualizer provides multiple views of a DataSet in the screenshot above.

The visualizer allows you to see the XML, schema and contents of the various tables within the DataSet. It also allows you to view updates, deleted rows, etc.

I can tell you from personal experience, if you deal with DataSets, this is a MUST HAVE add-in. It is free, so you have no excuse.

View the flash demo! (874 KB)
Get XML Visualizer!

Those of you using Visual Studio 2005 already have similar functionality built into Visual Studio. They are called debugger visualizers and you actually get several in addition to one similar to the XML Visualizer.

October 17, 2005
9.0

Tip #7: Region Creation Macro

Filed under: Visual Studio 2003, Visual Studio 2005, Macros, Beginner — Colin Murphy @ 7:50 pm

Regions are an invaluable way to organize your code within your files. For those of you who don’t know about them, they appear as collapsable code blocks which allow you to group your code and make navigation through long files easier. Regions are pretty easy to create, simply type

//C# Region Example
#region RegionName
#endregion

'VB.NET Region Example
#Region "RegionName"
#End Region

You can then collapse the region within Visual Studio so you have a higher level view of your code.

Hovering over a collapsed region displays a tooltip showing the region contents!
The screenshot above shows several collapsed regions. Hovering over a collapsed region displays a tooltip showing the region contents.

In a perfect world, you’d already know your code structure before you even began to write it, in which case, you might add your regions first and then add the code into the appropriate region. While this is actually a very good practice (see Tip #5 to see how to customize your code template to automatically add your common region blocks), it isn’t always practical.

Sometimes you don’t know you need a region until you realize you’ve written five methods that all go together. Or perhaps you wrote one large method originally, but refactored it into a bunch of shorter methods that now belong in a region. Whatever the circumstances, I can almost guarantee that you will want to regionize certain blocks of code after you have already coded them.

Today, I’m introducing a CreateRegion macro that I wrote. To use the macro, simply select the block of code you wish to turn into a region and run the macro. The macro will then prompt you for the desired region name and will encapsulate the selected text within a region. It’s a minor automation, but over your coding career, it can definitely save you some time and some typing. The macro supports both C# and VB.NET!

View the flash demo! (1.28 MB)
Download the code for the macro! 1.29 KB)

The code for the macro can also be found below:
(more…)
----------------------------------------------------------

Tip #9: Keyboard Shortcuts

Keyboard Shortcut Command
F7 Toggles between design and code views.
F9 Toggles breakpoint.
F12 Go to definition of a variable, object, or function.
Ctrl+Shift+7

Ctrl+Shift+8

Quickly navigate forward and backwards in the go to definition stack.
Shift+F12 Find all references of a function or a variable.
Ctrl+M, Ctrl+M Expand and collapse code outlining in the editor.
Ctrl+K, Ctrl+C

Ctrl+K, Ctrl+U

Comment and uncomment line(s) of code, respectively.
Shift+Alt+Enter Toggles between full screen mode and normal mode.
Ctrl+I Incremental Search.


Filed under: Visual Studio 2003, Visual Studio 2005, Debugging, Beginner, Intermediate, Advanced — Colin Murphy @ 1:23 pm

The majority of commands you can perform via Visual Studio’s toolbars and menus can also be performed utilizing keyboard shortcuts. For those of you wanting a complete list, check out this MSDN page which lists the default keyboard mappings broken down into categories. There are too many to cover in detail, but I’ll list some of the ones I use regularly:

Navigation:

  • Goto Line: Ctrl+G
    Brings up Go To Line allowing you to automatically jump to a line position
  • Toggle Bookmark: Ctrl+K, Ctrl+K
    Set a bookmark to allow you to easily jump back to that position later.
  • Next Bookmark/Previous Bookmark: Ctrl+K, Ctrl+N (Next); Ctrl+K, Ctrl+P (Previous)
    Moves between your set bookmarks.

Debugging/Running/Compiling:

  • Insert/Remove (Simple) Breakpoint: F9
    Create a default breakpoint which always fires when debugging.
  • Insert (Complex) Breakpoint: Ctrl+B
    Brings up breakpoint dialogue allowing for conditional breakpoints, etc.
  • Start (with Debugging if in Debug build): F5
  • Run without Debugging: Ctrl+F5
    If you are in a release build, both F5 and Ctrl+F5 behave the same.
  • Iterate Through Build Errors: F8
    If your build fails, you can press F8 to move between the various errors in the task list.

Writing Code:

  • Comment and Uncomment Code: Ctrl+K,Ctrl+C (Comment), Ctrl+K, Ctrl+U (Uncomment)
    Works on current line or multiple selected lines.
  • Intellisense Autocomplete: Alt+RArrow or Ctrl+Space
    Start typing a keyword, then press Alt + Right Arrow or Ctrl + Space and Intellisense will complete the word (if what you’ve typed is identifiable) or bring up Intellisense with the nearest match. You can also do this before typing and Intellisense will come up.
  • Dynamic Help: F1
    Get in center of a method, type, class, etc in editor, press F1. Help comes up on that topic if it exists.
  • View Code-Behind: F7
    View the code-behind file from the .ASPX or .ASCX file
  • Switch between Design and HTML View: Ctrl + PgUp or Ctrl + PgDown
    Move between HTML and Design view on .ASPX and .ASCX files.
  • Switch between Tabs: Ctrl+Tab (Back), Ctrl+Shift+Tab (Forward)
    Useful for moving between open files in Visual Studio. Keeps track of the order in which you last visited the tabs and cycles through that.
  • Go To Definition: F12
    Click, Select or have cursor on text you wish to go to the definition of.
  • Last cursor position: Ctrl + - (Back), Ctrl+Shift+- (Forward)
    Useful for moving between files you have been editing. Especially useful if you have done a Go To Definition or if you are stepping though code in the debugger.
  • Toggle Wordwrap:Ctrl + R, Ctrl + R
    While you should make it a practice to limit the width of your lines so they don’t require wrapping, sometime you do have lines that scroll off the Screen. This wraps them for you so you can see the entire text without scrolling.

View the flash demo! (2.81 MB)

----------------------------------------------------------

Tip #10: Building Better Documentation with NDoc

Filed under: Visual Studio 2003, Visual Studio 2005, Plugins, Intermediate, Advanced — Colin Murphy @ 5:16 pm

If you’ve ever wanted to produce spiffy code documentation similar to that found for Microsoft .Net or that found on MSDN, this tip applies to you!

Visual Studio already provides a web documentation feature right out of the box which offers a basic level of web documentation for little effort (view an example), but if you are developing a professional API, SDK or application you likely need to deliver more detailed code documentation. That’s where nDoc comes in. nDoc is a powerful, open source application that builds extremely feature rich documentation (both Web and .HTM versions) from your inline code comments.

A screenshot of nDoc's generated HTML documentation.
A screenshot of nDoc’s generated documentation. Click to see the actual HTML output.

You’ll find that nDoc’s generated HTML documentation is almost exactly the same format as that found on MSDN’s site.

View the flash demo! (3.02 MB)
Get nDoc!


Thursday, May 03, 2007

Motorola Mpx200 Serisi İçin Temel Bilgiler

== 1 == MASTER RESET
Telefona hard reset atar kurulan ve yüklenen herşey silinir (hafıza kartındakiler hariç)

1-100 full şarj yapın
2-Telefonu kapatın
3-Şarj yada usb kablosu takılı olmasın.
4-Mavi tuş + açma kapama tuşuna basın
5-Sorulan soruya yes diyin.(yesin altındaki tuşa basıcaksınız)

Bu işlem bilgisayardaki format ve ardından windowsun yeniden yüklenmesi gibi bir işlem tahmin ettiğiniz üzere.(diğer partitiona birşey olmuyor tabii ama oraya kurduğunuz programlar çalışmayabilir ve kısayolları kesinlikle kaybolur ,siz sonra kendiniz ekleyebilirsiniz ) (web) [ EKLEME: File manager , resim programı ve mms desteğini telefonun yanında verilen cd deki klasörde bulunan programları activesync ile telefon iletişim halindeyken kurarak bunları da geri getirebilirsiniz. ] [ EKLEME: Eğer Sprite backup gibi bir program kullanarak reset öncesi sistemin imagini alırsanız tüm program ve ayarları tekrar yapmanıza da gerek kalmaz , bu da aynı norton ghost olayı gibi. ]

== 2 == Flashlama işlemi (2003 yada 2002 romunu telefona yüklemek)
Dikkat edin bu işlem riskli bir iştir ve makinanıza zarar verebilme ihtimaliniz var.Ben zarar veren duymadım ama bu mümkün üstelik garantisinide kesinlikle herhalikarda bozmuş olacaksınız. Niye canım ben program yüklüyorum, bu yazmıyor kılavuzunda diye kendinizi kandırmayın garantiyi bozar, isteyen açsın sorsun motorola servisine.
Örneğimizde SUPER_MOTO_2_MPX200(2003).rar dosyasını kullanarak 2003 romu yükleyeceğiz... (web)

-Önce yüklediğiniz SUPER_MOTO_2_MPX200(2003).rar dosyasını bir dizine açıp içinde bulunan Motorola_Mobile_Upgrade_Wizard_V1.2.0_setup.exe programını makinanıza kurun.
2-Flash programını çalıştırmadan önce telefonunuzu kapatın ve SOL YÖN TUŞUNA basılı tutarak usb kablosu ile bilgisayara bağlayın.
3-Cihaz kapalı olmasına rağmen bilgisayarınız yeni bir modem cihazı bulunduğuna dair sizi uyaracak ve sürücüleri isteyecek SUPER_MOTO_2_MPX200(2003).rar dosyasını açtığınız dizini hedef dizin olarak gösterin ve sürücüleri tanıtın.
SAKIN CİHAZI ÇALIŞTIRMAYIN TELEFON KAPALI ŞEKİLDE DEVAM EDİN.
(web)
4-Flash programını çalıştırıp SUPER_MOTO_2_MPX200(2003).img dosyasını telefona yükleyin.
5-Mpx200 ü bilgisayardan ayırın (Usb kablosunu çıkarın )
6-Mpx200 ün Yön Tuşlarının ortasında bulunan MAVİ DÜĞMESİNE BASILI TUTUN ve Mavi Tuşu bırakmadan Cihazı açın
7-Makinayı resetliyeyimmi diye bir soru gelecek Yes deyin ve Format daha sonrada işletim sistemi yüklenmesi işlemlerini bekleyip WSP 2003 ün keyfini sürün.
(web)

== 4 == ÖZEL İŞLEM VE MENÜ KOMBİNASYONLARI
* # * * 8 3 7 # Version info
* # * * 3 7 2 # FQC
* # * * 3 6 4 # Engineering menu
* # * * 2 6 6 * 0 # Set as data COM port
* # * * 2 6 6 * 1 # Set as log COM port
* # * * 7 9 7 # Time to failure timer & Power down code
* # * * 2 2 6 3 * 0 # Set to default Band
* # * * 2 2 6 3 * 1 # Disable GSM Band
* # * * 2 2 6 3 * 2 # Disable DCS Band
* # * * 2 2 6 3 * 3 # Disable EGSM and DCS Band
* # * * 2 2 6 3 * 4 # Disable PCS Band (web)


== 5 == PROGRAM VE TEMALARIN KURULUMU

mpx200de CAB dosyaların yüklenmesi (Sekronizasyonda iken tabii) .cab fileları \IPSM\Windows\Start Menu\Accessories e yada storage da (kart varsa) bir yere kopyalayın Accessories e attıysanız …menüden Programs > ... > Accessories e gelip attığınız cab i çalıştırın otomatik olarak kurulacak ve cab silinecektir ... silinmesini istemiyorsanız ya readonly yapın yada copyasını alın yok başka bir yere koyduysanız bir file manager ile oraya gidip çalıştırmanız gerekecek aynı şekilde.
(web) [ EKLEME: uzantısı *.hme olan temalari da aynı şekilde yükleyebilirsiniz.
ve kurulan program ve temaların kaldırılması için de... sırasıyla
Programs ... Settings ... Remove Programs a gelip kaldıracağız. ]


YARARLI OLABİLECEK LİNKLER

Muhteşem bir site yok yok ve freeware
http://www.airfagev.com/downloads.asp

Faydalı bilgiler-İngilizce
http://www.mpxzone.com/mpx200_faq.php

ACROBAT READER FOR WINDOWS MOBILE:
http://www.adobe.com/products/acrobat/readerforppc.html

mpx200 hakkında soru ve cevaplar, ingilizce ama faydalı.
https://hk-motoserviceone.motorola.com/en/motorola/User/SMPhone.jsp

smartphone romları (en stabil ve iyi 2002 olduğu iddia ediliyor ):
2002 - http://www.topfiles.net/ebay/b___3991/MXFLG2.rar (şifre: download14)
(web) [ EKLEME: 2003 - http://www.topfiles.net/ebay/mpx200/2003333/MX2004.rar

WM2002 firmware`lerinin incelemeleri ... Ayrıca hangi dilde olduklarıda yazıyor.
http://www.haosmultimedia.com/mpx200/ ]


firmware`ler için diğer bir link(bence üsttekileri aldıysanız bunlarla vakit kaybetmeyin boşuna)
http://www.mpxzone.com adresinde bulabilirsiniz.
Yararlı bir link...
http://cordo.free.fr/spf/Logiciels/Divers/